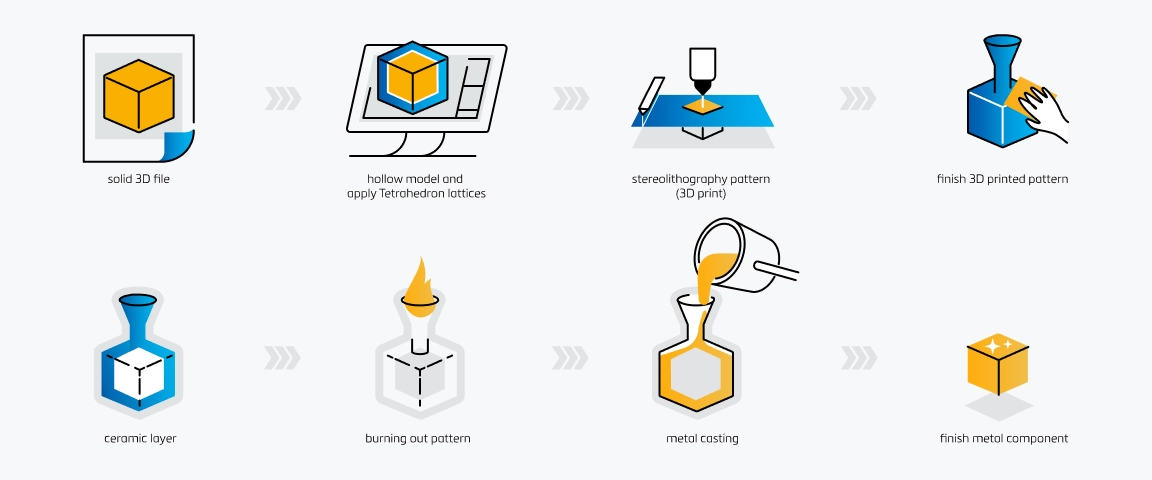
3D Printing in Investment Casting Workflow
Modern jewelry manufacturing and industrial prototyping rely heavily on casting 3d printing to bridge the gap between digital precision and physical metal. We have optimized our materials to integrate seamlessly into this traditional workflow, ensuring that the transition from a digital file to a final cast piece is flawless. By replacing hand-carved wax with high-precision printed patterns, we enable mass customization without sacrificing the quality of the final metal product.
Step 1: Digital Design and CAD
The process begins with Jewelry CAD design. Designers utilize specialized software to create intricate geometries and complex lattice structures that would be nearly impossible to achieve via manual carving. Our workflow relies on these digital files being watertight and optimized for printing, ensuring that every micron of detail in the design is ready for physical production.
Step 2: Pattern Production with SLA/DLP
We utilize SLA 3D printing, DLP, or LCD technology to produce the sacrificial pattern. Our castable resins are specifically formulated for 405nm wavelength printers and laser-based systems. Key advantages at this stage include:
- High Resolution: Capturing extremely fine details required for high-end jewelry.
- Low Shrinkage: Ensuring the printed model matches the digital dimensions exactly.
- Speed: Rapid production of multiple patterns in a single print run.
Step 3: Post-Processing Essentials
Once the printing is complete, the models undergo cleaning and curing. Our resins feature low viscosity, making them easy to clean without aggressive scrubbing that could damage delicate features. Proper post-curing is essential to ensure the photopolymer resin achieves the necessary stiffness and stability for handling during the spruing process.
Step 4: Spruing and Treeing Techniques
We attach the cured 3D printed models to a central wax sprue, creating a “tree.” This step dictates how molten metal will flow into the mold. Because our resin is compatible with standard casting waxes, it adheres easily to the sprue, ensuring a secure assembly that won’t shift during the investment pouring.
Step 5: Investing with Ceramic Slurry
The tree is placed inside a flask and filled with liquid investment material, typically a gypsum-based powder or ceramic shell casting slurry. We ensure our materials are chemically compatible with standard investment powders to prevent any adverse reactions at the interface surface, guaranteeing a smooth mold cavity.
Step 6: The Burnout Phase
This is the most critical differentiator in casting 3d printing. The flask is placed in a kiln to burn away the printed pattern. Our resins are engineered for zero ash content, meaning they burn out completely clean.
- No Residue: Eliminates defects in the final metal.
- Thermal Expansion Control: Prevents the investment mold from cracking during heating.
- Direct Replacement: Mimics the traditional lost wax process behavior.
Step 7: Casting and Finishing Metal
Once the mold is clean and hot, molten metal is poured into the cavity. Because of the clean burnout provided by our investment casting resin, the metal flows smoothly into every detail. After cooling, the investment is broken away to reveal a metal piece with superior surface quality and no porosity, significantly reducing the time and labor required for final polishing and finishing.
Choosing the Right Castable Resin
Selecting the correct material is the single most critical decision in casting 3d printing. The resin acts as a sacrificial mold pattern, and its chemical properties directly dictate the quality of the final metal piece. We engineer our photopolymer resins to bridge the gap between digital precision and traditional foundry requirements.
Zero Ash Content Importance
For a successful cast, the pattern must disappear completely during the burnout phase. We prioritize zero ash content in our formulations to ensure the resin combusts cleanly without leaving any soot or residue inside the mold. Even microscopic amounts of leftover ash can react with molten metal, causing porosity or surface pitting in the final casting. This is especially vital when working with reactive materials like aluminum alloy, where purity is non-negotiable.
Managing Thermal Expansion
One of the biggest challenges in casting with 3d printer resins is thermal expansion. Unlike traditional wax, standard plastics expand significantly before they melt or burn. If a resin expands too aggressively inside the hardened ceramic shell or gypsum investment, it can crack the mold, ruining the part. Our castable resins are formulated to soften and melt prior to significant expansion, relieving internal pressure and protecting the integrity of the investment mold.
Achieving High Detail and Precision
The primary advantage of using SLA or DLP printers is resolution. A high-quality castable wax resin must capture the intricate geometries of a jewelry CAD design or industrial prototype without softening or losing definition during the printing process. We focus on high dimensional stability and low shrinkage, ensuring that the printed model matches the digital file exactly. This precision is what allows for the direct casting of complex features like filigree or threaded holes that are impossible with traditional wax carving.
Burnout Schedule Compatibility
Not all resins react the same way to heat. A practical casting resin must be compatible with standard burnout schedules used by foundries. This means the material should burn out cleanly within typical temperature ranges (usually between 700°C and 950°C) without requiring specialized, ultra-high-temperature investments. Whether you are casting copper alloy components or precious metals, the resin must follow a predictable burnout curve to ensure consistent, repeatable results in a production environment.
Key Applications of Casting 3D Printing

The versatility of casting 3d printing has pushed it far beyond hobbyist workshops. By bridging the gap between digital precision and traditional metallurgy, we enable industries to produce complex metal parts that were previously impossible or too expensive to manufacture using standard tooling.
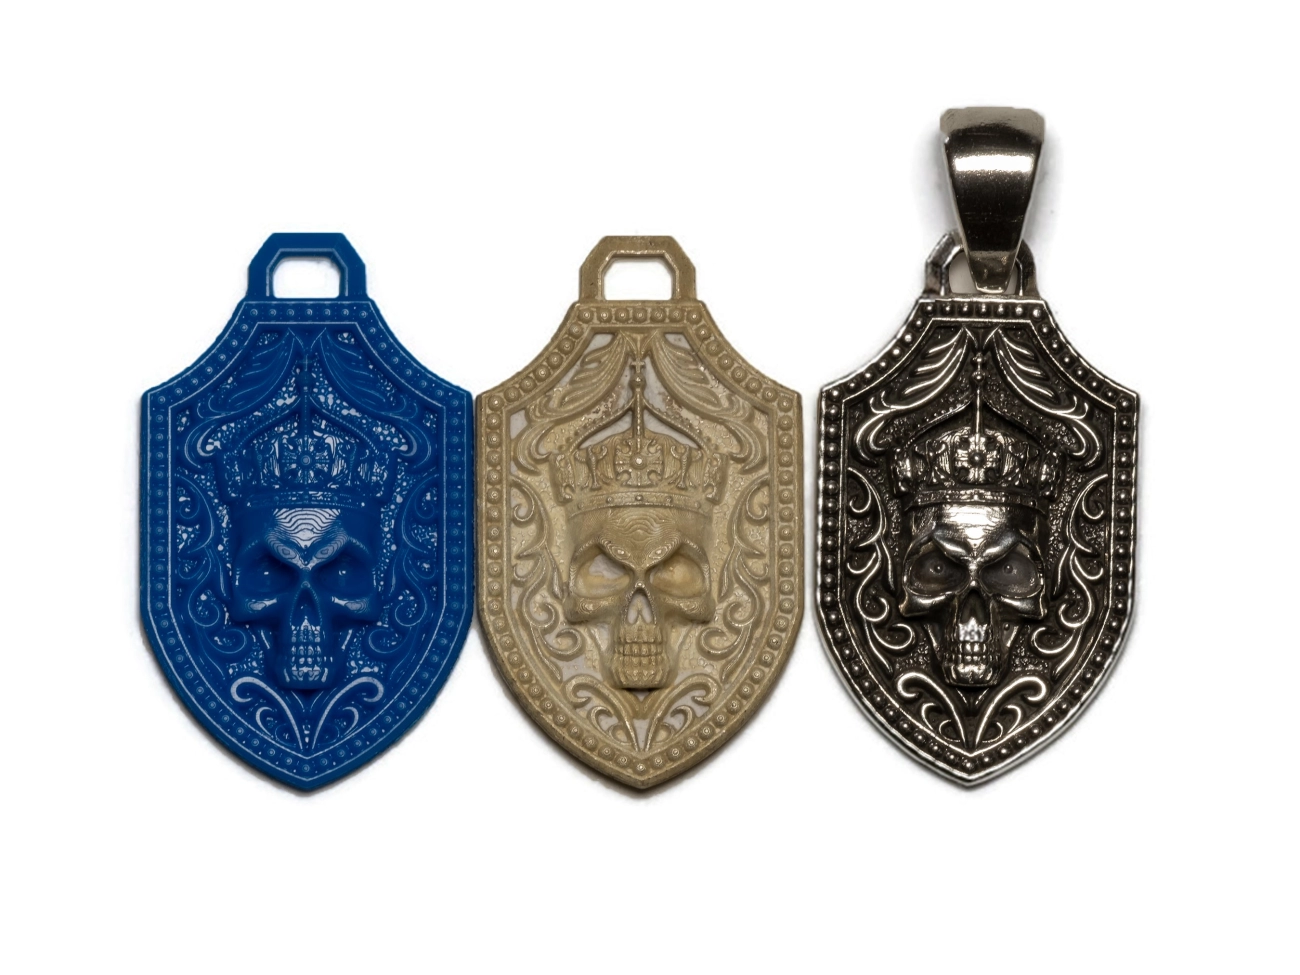
Jewelry Manufacturing and Custom Designs
This is our home turf. The jewelry industry has aggressively adopted Jewelry CAD design to offer bespoke pieces without the labor intensity of hand-carving wax. Using high-precision castable resins, jewelers can print intricate filigree, pavé settings, and organic shapes that hold their form perfectly during the investment process.
- Mass Customization: Create unique engagement rings on demand.
- Surface Quality: Our resins ensure the cast metal requires minimal polishing.
- Reliability: Direct casting from 3D prints eliminates the need for rubber molds in low-volume runs.
Dental Industry Crowns and Bridges
In dental laboratories, fit is everything. Dental casting patterns produced via SLA or DLP printing offer superior marginal integrity compared to traditional wax-ups. We see labs using casting with 3d printer technology to produce copings, crowns, and partial denture frameworks. The critical factor here is a clean burnout; any ash residue can cause porosity in the metal, leading to a failed restoration. Our materials are engineered to burn out completely, ensuring the final medical device is safe and durable.
Industrial Engineering Prototypes
Engineers use castable resins to bypass expensive tooling for short-run metal parts. Instead of machining a block of steel, they can print a pattern and cast it in aluminum, bronze, or steel for functional testing. This rapid prototyping capability drastically reduces lead times for Industrial Engineering Prototypes. When moving from a printed prototype to a functional metal part, referencing a steel casting foundry guide for precision components helps ensure the design meets industrial standards for stress and durability. This workflow allows for real-world testing of metal components before committing to mass production molds.
Optimizing Prints for Casting
Handling Shrinkage and Scaling Factors
When dealing with casting 3d printing, precision is non-negotiable. Metal naturally shrinks as it cools from a liquid to a solid state, which means the printed pattern must be slightly larger than the desired final object. I always calculate a scaling factor based on the specific metal alloy being used; for instance, casting into complex materials like titanium alloy requires careful compensation for thermal contraction. Our resins are engineered for high dimensional stability, ensuring that the print itself doesn’t warp or shrink unpredictably before the casting process begins. This allows us to isolate the metal shrinkage variable and adjust the digital model in the slicer software with confidence.
Improving Surface Finish
The surface quality of the 3D printed pattern directly dictates the finish of the final metal piece. In casting with 3d printer workflows, any layer lines or pixelation on the resin model will be faithfully reproduced in the metal. To achieve a professional finish, I recommend printing at lower layer heights, typically between 25 to 50 microns. This resolution minimizes the “stair-stepping” effect. While our resins are designed for high-precision detail capture, ensuring the digital mesh is high-resolution and the printer settings are dialed in will significantly reduce the need for manual polishing after casting.
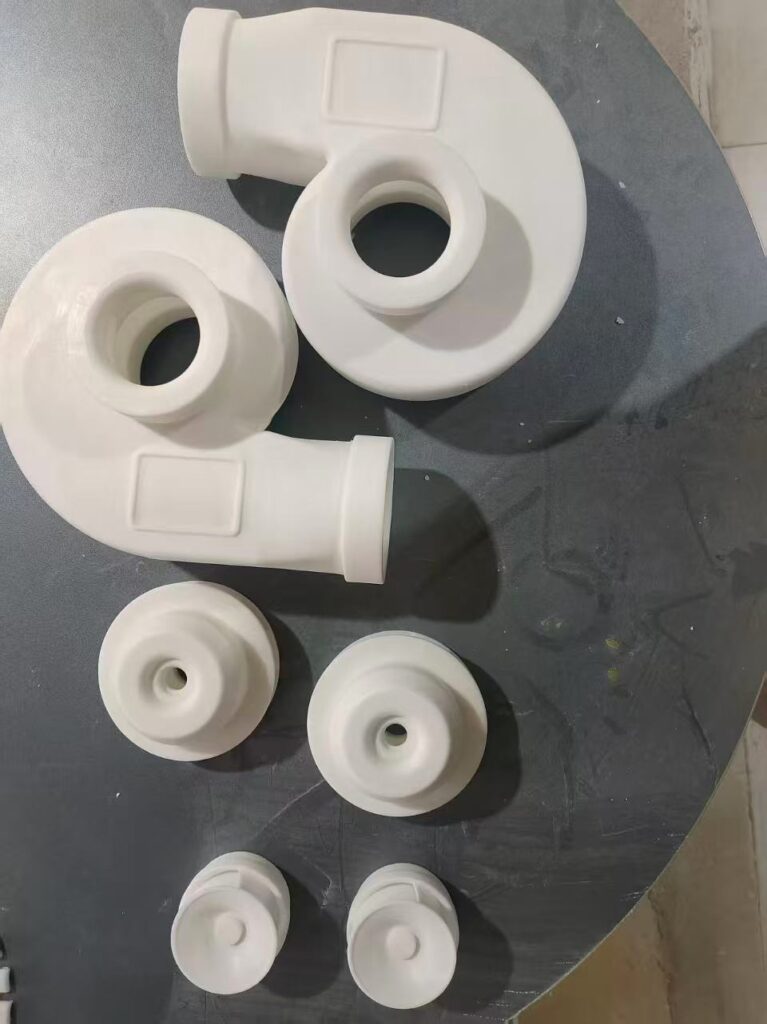
Hollow vs Solid Models
Choosing between hollow and solid geometries is critical for preventing investment mold failure. While small items like rings can often be printed solid, larger industrial parts or chunky jewelry pieces should be hollowed out. Solid blocks of resin expand significantly during the initial stages of burnout, which can exert enough pressure to crack the ceramic investment shell.
- Wall Thickness: I generally aim for a wall thickness of 2mm to 3mm. This provides enough strength for handling while minimizing the volume of material that needs to burn out.
- Drain Holes: It is essential to add drain holes to hollow models. Uncured resin trapped inside can cause casting defects or even damage the mold during the heating cycle.
- Lattice Supports: For larger hollow sections, internal lattice structures help maintain the shape of the model without creating a solid mass of plastic.
Troubleshooting Common Casting Challenges
Moving from a digital file to a physical metal part involves variables that can make or break the final product. While casting 3d printing streamlines the pattern-making phase, the transition to the burnout and pour stages requires strict process control. Even with the highest quality resin, ignoring the physics of the investment process will lead to defects. Here is how we address the most frequent issues foundries and jewelers encounter.
Preventing Investment Cracking
The most common failure when switching from wax to resin is flask or shell cracking. This happens because photopolymer resins tend to expand thermally before they melt or burn, creating internal pressure that pushes against the investment material.
- Control the Ramp Rate: Do not rush the initial heating phase. We recommend a slow ramp (around 1-2°C per minute) specifically during the 200°C to 300°C window to allow the resin to soften and combust without shocking the mold.
- Resin Selection: Use materials specifically engineered for low thermal expansion. Our resins are designed to collapse inward rather than expanding outward, protecting the integrity of the mold.
- Mold Strength: Ensure your investment mix is correct. When utilizing professional precision investment casting services, the ceramic shell is built to withstand these specific pressures, but DIY setups need to ensure the flask is robust.
Fixing Rough Metal Surfaces
A rough or pitted surface finish usually indicates a reaction between the resin and the investment, or residual ash left inside the mold.
- Zero Ash Content: This is non-negotiable. If your resin leaves ash behind, that residue will embed itself into the metal surface. We formulate our resins to burn out completely clean.
- Proper Post-Curing: Never invest a sticky or under-cured print. Uncured resin on the surface of the model can chemically react with the gypsum or phosphate-bonded investment, creating a rough “orange peel” texture on the final casting.
- Clean Wash: Ensure all isopropyl alcohol has evaporated from the model before investing. Trapped solvent can boil during the setting phase, creating micro-porosity.
Solving Incomplete Casting Issues
Incomplete castings, or “misruns,” occur when the molten metal freezes before filling the entire mold cavity. In casting with 3d printer patterns, this is often due to trapped gas or insufficient burnout.
- Gas Venting: Resin patterns generate more gas during burnout than traditional wax. You must design your sprue tree with adequate venting to allow these gases to escape rapidly.
- Burnout Duration: Ensure you hold the peak temperature long enough. If the center of a thick model hasn’t fully vaporized, it creates a blockage.
- Temperature Management: Match your flask temperature to the metal. For high-temperature applications, such as investment casting steel alloys, the mold must be hot enough to maintain metal fluidity throughout the pour, ensuring fine details are captured before solidification.
Why Foundries Use Vastmaterial Resins

When we talk about casting 3d printing, we know that consistency is the only metric that matters on the foundry floor. We have formulated our resins to bridge the gap between digital precision and physical casting reliability, ensuring that the transition from a 3D model to a metal part is seamless.
Reliability and Chemical Consistency
We understand that a failed cast means lost time and wasted metal. Our manufacturing process ensures strict chemical consistency from batch to batch. You won’t have to constantly tweak your settings; our investment casting resin performs predictably every time, allowing you to scale production without the fear of pattern failure. This reliability is crucial for businesses that cannot afford the downtime associated with inconsistent materials.
Printer Compatibility
We designed our materials to be universally compatible with the hardware you likely already own. Whether you are running laser-based SLA systems or 405nm LCD/DLP printers, our resins are optimized to deliver high-resolution prints. This versatility makes casting with 3d printer technology accessible without needing proprietary, expensive equipment, streamlining your workflow immediately.
Stiffness and Melt-ability Balance
The perfect pattern needs to be tough enough to handle but clean enough to burn out. We have engineered a specific balance to meet these opposing needs:
- Handling Strength: Our resins offer high dimensional stability and stiffness, ensuring thin walls and intricate details don’t warp during the investing process.
- Clean Burnout: We prioritized a zero ash content formula. The resin melts and vaporizes completely, leaving a pristine mold cavity ready for anything from precious metals to industrial prototypes for large steel casting solutions.
This balance ensures that the final metal piece mirrors the digital design exactly, with no residue to mar the surface.
Frequently Asked Questions
What is the best resin for lost wax casting?
The most effective resin for casting 3D printing is one that guarantees zero ash content upon burnout. If a resin leaves residue inside the mold, the final metal piece will suffer from porosity and surface defects. You need a material specifically engineered for investment casting that offers high dimensional stability and low shrinkage. Our castable resins are formulated to work seamlessly with SLA, DLP, and LCD printers, providing the clean burnout required for professional jewelry and industrial applications.
How do I prevent ash residue in casting?
Preventing ash starts with choosing the right material. Standard 3D printing resins often leave behind carbon ash that clogs the ceramic shell, leading to failed casts. To avoid this, use a specialized investment casting resin designed to vaporize completely. Additionally, adhering to a strict burnout schedule is crucial. As a top lost wax casting supplier, we know that controlling the ramp rate and hold times in the kiln ensures the pattern is fully eliminated without damaging the investment mold.
Can I use any 3D printer for casting patterns?
While many printers exist, not all are suitable for creating castable patterns. FDM (filament) printers generally lack the resolution needed for fine jewelry or dental details. For the best results in casting with a 3D printer, we recommend using resin-based systems like SLA, DLP, or LCD machines operating at a 405nm wavelength. These printers deliver the smooth surface finish and intricate detail necessary for success in a professional lost wax casting foundry.