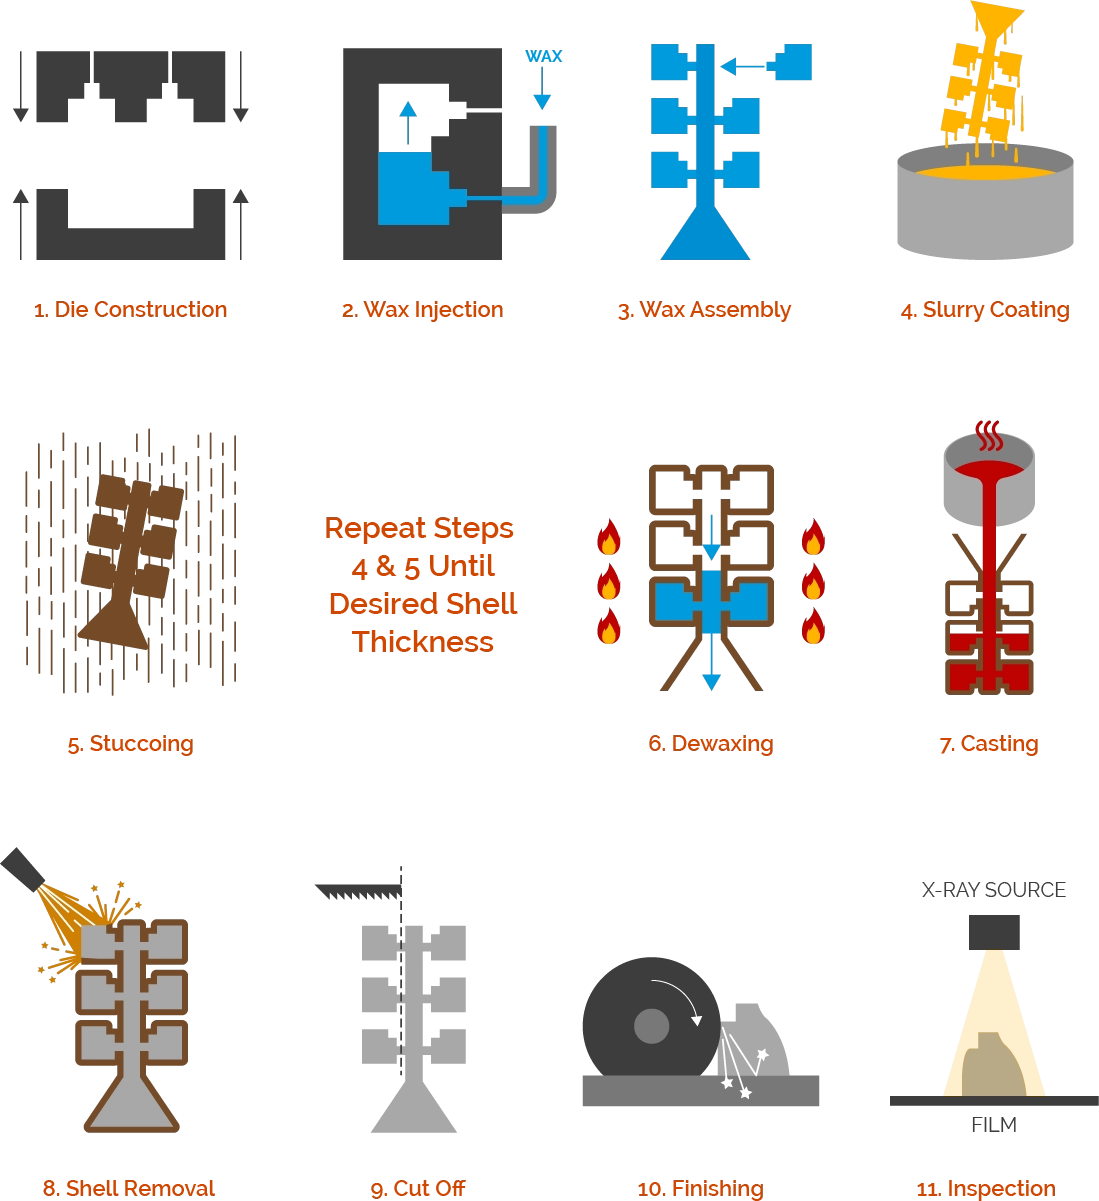
Investment mould guide for engineers covering wax injection tooling design cost materials lifespan and why vastmaterial is a trusted partner.
You already know that investment casting delivers complex, high-precision parts…
But the success of your project actually hinges on one critical factor: the investment mould.
Are you struggling to balance upfront tooling costs with long-term tool life? Unsure if you should specify aluminum or steel tooling for your production volume?
At Vastmaterial, we know that a poorly designed wax injection die can destroy both your budget and your timeline.
In this guide, we are cutting through the noise to give you a definitive engineering analysis of mould design, material selection, and shrinkage calculations.
If you are looking to optimize your manufacturing strategy and secure the best ROI on your tooling, this guide is for you.
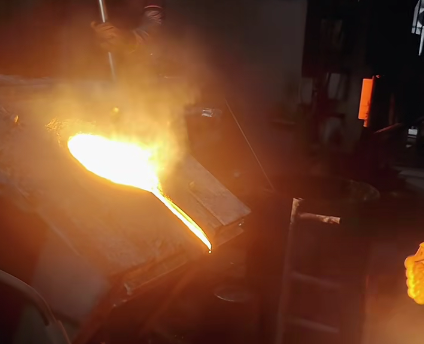
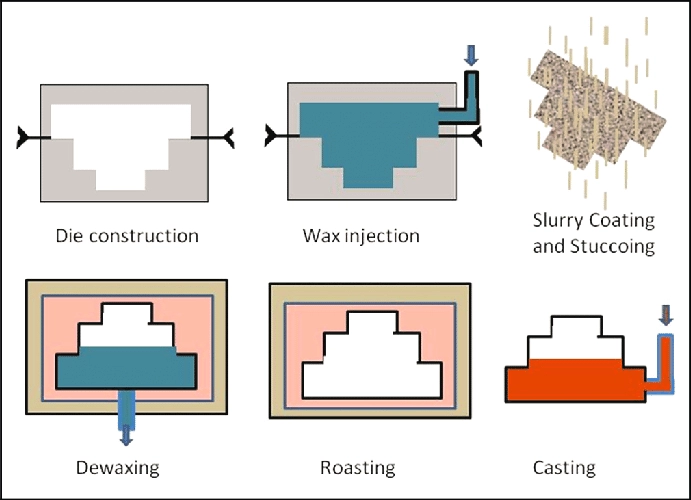
What Exactly is an Investment Mould?
In the world of precision manufacturing, terminology can often get blurry. When we discuss an investment mould, we are specifically referring to the permanent tooling used to create wax patterns, technically known as a wax injection die. This is the foundation of the entire lost wax casting process.
Many buyers confuse the permanent metal tool with the temporary ceramic shell. To get the precision you need, it is crucial to understand that the “mould” you pay for upfront is the asset that ensures consistency across your production run.
Wax Injection Die vs. The Final Ceramic Shell
The distinction here is vital for understanding your tooling costs. The investment mould is a precision-machined metal block—usually aluminum or steel—designed to form the sacrificial wax pattern.
- The Wax Injection Die: This is your permanent asset. We inject molten wax into this die to create a replica of your final part.
- The Ceramic Shell: This is the temporary mold. We dip the wax pattern into a ceramic slurry to build a hard shell. Once the metal is poured, this shell must be destroyed to reveal the part.
You invest in the die to produce the patterns; the shell is simply a vessel for the molten metal during the ceramic shell casting phase.
The Role of the Master Pattern
Historically, a master pattern was a physical replica of the final part used to make the mold. Today, with advanced CNC machining, we typically skip the physical master pattern and cut the wax injection die directly from your 3D CAD data.
However, the concept remains the same: the tooling acts as the “negative” image. It must account for specific shrinkage rates—both for the wax as it cools and the metal as it solidifies. This double shrinkage calculation is engineered directly into the cavity of the mold.
Permanent Tooling vs. Consumable Molds
When budgeting for a project, you need to separate your capital equipment from your unit costs.
- Permanent Tooling (Investment Mould): This is a one-time cost. Whether we machine it from high-grade aluminum or tool steel, this mold is designed to last for thousands of cycles. It is the primary driver of your upfront NRE (Non-Recurring Engineering) expenses.
- Consumable Molds: The ceramic shell is single-use. Every metal part produced requires its own wax pattern and its own ceramic shell. This cost is amortized into the piece price of each casting.
By securing a high-quality investment mould, you guarantee that every sacrificial wax pattern produced is identical, ensuring tight tolerances in the final metal components.
Types of Investment Mould Tooling Options
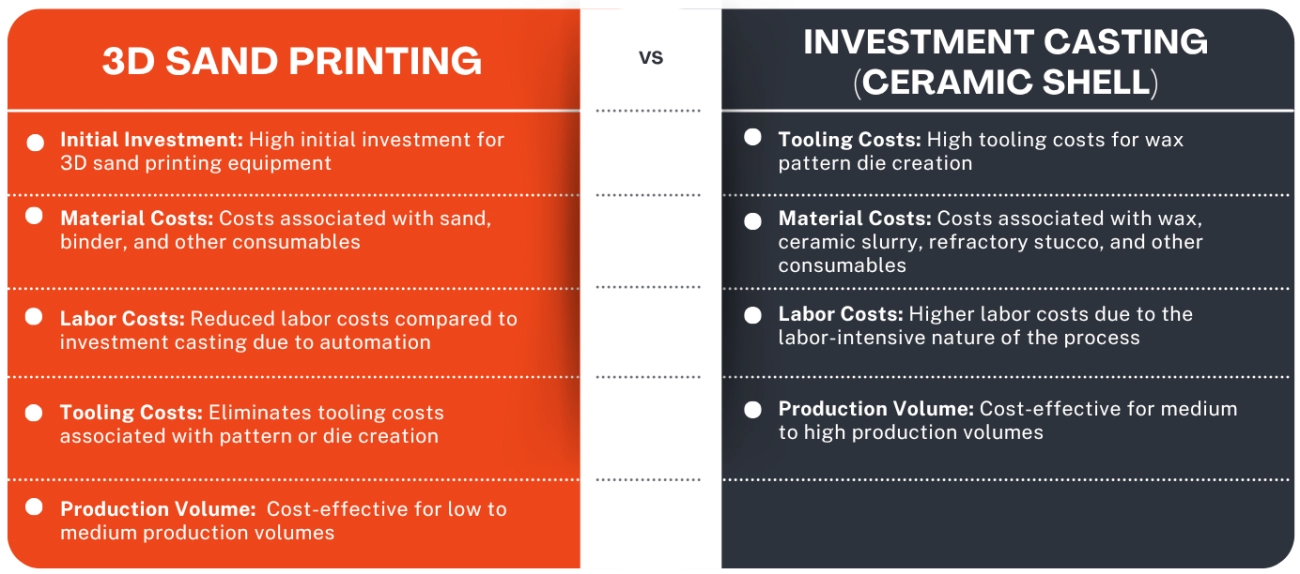
Selecting the right tooling strategy is critical because it directly dictates your upfront costs and per-unit pricing. We don’t use a “one-size-fits-all” approach here; the choice depends heavily on your production volume, budget, and how quickly you need parts in hand.
Rapid Prototyping and Soft Tooling
For low volumes or design verification, we turn to rapid tooling solutions. If you only need a handful of parts to test fit and function, investing in hardened steel is a waste of money.
- 3D Printed Patterns: We can bypass the wax injection die entirely by 3D printing the patterns directly in castable wax or PMMA. This is ideal for quantities under 10 units.
- Soft Tooling: We use lower-grade aluminum or softer alloys to cut simple molds quickly. These are perfect for runs of 50 to 100 parts where you need a physical mold but don’t require long-term durability.
Production Tooling: Aluminum (T6/7075) vs. Steel (P20/H13)
When you are ready to scale, the debate shifts to aluminum vs steel tooling. This decision impacts the lifespan of the die and the cycle time of the wax injection.
- Aluminum (Aircraft Grade T6/7075): This is the workhorse for low-to-medium volume production. Aluminum is easier to machine than steel, which lowers the initial tooling cost. It also offers excellent heat transfer, allowing the wax to cool faster. However, it is softer and more prone to wear over thousands of cycles.
- Steel (P20/H13): For high-volume production, hardened steel is the standard. P20 is a pre-hardened steel good for general use, while H13 is fully hardened and used for high-wear areas or complex slides. Steel molds hold tight tolerances over millions of shots. As a top lost wax casting supplier for precision metal components, we typically recommend steel when consistency is paramount over a long product lifecycle.
Manual vs. Automatic Tooling
The complexity of the investment mould determines how we extract the wax pattern.
- Manual Tooling: The operator manually disassembles the mold to remove the wax pattern. This keeps tooling costs low because there are no complex ejection mechanisms, but it slows down the cycle time significantly.
- Automatic Tooling: These molds function like plastic injection molds, using hydraulic or mechanical ejection systems to pop the wax pattern out automatically. While the upfront cost is higher, the reduced cycle time lowers the unit price for large orders.
Comparison of Tooling Materials
| Feature | Aluminum (7075/T6) | Steel (P20/H13) |
|---|---|---|
| Machining Cost | Lower | Higher |
| Heat Dissipation | Excellent (Faster cycles) | Moderate |
| Durability | Good (Low/Mid volume) | Excellent (High volume) |
| Repairability | Difficult to weld/repair | Easier to weld/repair |
| Surface Finish | Good | Superior |
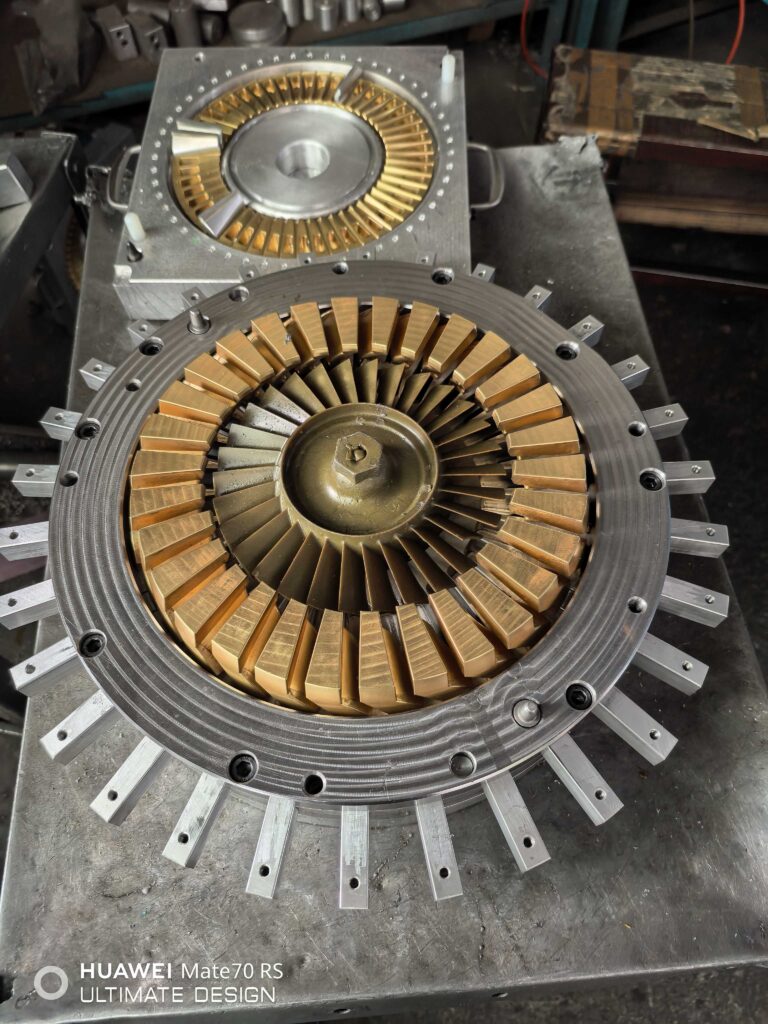
The Anatomy of a High-Quality Investment Mould
Core Components: Cavity, Cores, and Ejector Pins
When we engineer an investment mould, we are essentially building a precise negative to create a positive wax replica. The assembly relies on three main players:
- The Cavity: This shapes the exterior profile of the part.
- The Cores: These inserts form the internal geometry and holes.
- Ejector Pins: These mechanisms push the solidified wax pattern out of the die.
The placement of ejector pins is critical; they must apply force evenly to avoid warping the soft wax. For industries requiring tight tolerances, such as those served by an aerospace casting manufacturer for high-performance alloy components, even a micron of misalignment in these components can render the tool useless.
Soluble Wax Cores for Complex Interiors
Standard steel cores have limits—specifically, they cannot handle trapped undercuts. If you cannot pull the metal core out in a straight line, the design fails. We solve this challenge with soluble wax cores.
We mold the internal shape using a special soluble wax, place that solid piece into the main wax injection die, and inject the standard pattern wax around it. Later, we dissolve the internal core in a mild acid or water bath, leaving a hollow, complex geometry behind. This technique is essential for intricate precision casting tooling where internal channels are curved or irregular.
Calculating “Double Shrinkage”
You cannot simply cut the mold to the final part dimensions. We have to calculate the pattern shrinkage allowance based on two distinct phases, often referred to as “Double Shrinkage”:
- Wax Shrinkage: The wax contracts as it cools inside the aluminum or steel tool.
- Metal Shrinkage: The final alloy contracts as it solidifies in the ceramic shell.
The shrink rate varies significantly depending on the material. For instance, the expansion factors in a cast aluminum foundry guide for processes and alloys will differ from those used for stainless steel. Getting this math wrong means the final part will be out of tolerance, so we always calculate the total expansion factor before CNC machining the mold.
Design Guidelines for Engineering Success
When we engineer an investment mould, the goal is simple: create a tool that produces consistent wax patterns with minimal scrap. Good design upfront saves thousands in rework later and ensures the longevity of the tooling.
Draft Angles: Essential Requirements
You cannot ignore physics. If vertical walls are perfectly straight, the vacuum created during ejection will damage the sacrificial wax pattern. We always apply draft angle requirements—typically around 0.5 to 1 degree—to vertical faces. This slight taper allows the wax to release cleanly from the wax injection die without dragging or distorting. For deep pockets or complex internal features, we often increase this angle to ensure smooth ejection every cycle.
Gate Placement Strategies
The gate is where the liquid wax enters the mold, and its location dictates the flow quality. We position gates to feed into the thickest sections of the part first. This strategy minimizes turbulence and air entrapment, which are common culprits for surface defects. Proper gating is a fundamental part of the stainless investment casting process, ensuring that the transition from wax to metal yields a dense, defect-free component.
Managing Parting Lines
Every CNC machined mold consists of at least two halves, and where they meet, a parting line is inevitable. We strategically place these lines on non-critical surfaces or edges where a slight witness mark won’t affect functionality or aesthetics.
- Flat Surfaces: We avoid placing lines across large, flat cosmetic areas where polishing would be difficult.
- Edges: Aligning the parting line with a corner makes the flash easier to remove during finishing.
- Tolerance: We keep the shut-off surfaces tight to minimize flash, reducing the manual labor needed for the final precision casting tooling.
Cost Analysis: What Drives Tooling Prices?
When we calculate a tooling cost estimation for a new project, the price tag isn’t arbitrary. It is strictly driven by the time it takes to design and machine the mold, and the materials we use to build it. Understanding these drivers helps you make smarter decisions about your budget and production timeline.
How Complexity and Undercuts Impact Machining Time
The geometry of your part is the biggest factor in the cost of CNC machined molds. If your design allows for a simple “open and shut” mold (two halves separating easily), the machining time is minimal.
However, features like undercuts, threads, or complex internal passages complicate the process. These require:
- Slides or Cams: Mechanical parts that move perpendicular to the mold opening to release undercuts.
- Loose Cores: Inserts that must be manually removed from the wax pattern after every cycle.
- Soluble Cores: Separate tooling required to create soluble wax inserts for internal geometry.
Every additional mechanism increases the engineering time and the hours the block spends on the CNC machine.
Single-Cavity vs. Multi-Cavity: Balancing Upfront Cost vs. Unit Price
Deciding between a single-cavity and a multi-cavity mold is a balancing act between your initial investment and your long-term piece price.
- Single-Cavity: Lower upfront tooling cost. Best for low-volume orders (under 1,000 pieces/year). The trade-off is a higher unit price per wax pattern because the injection cycle produces only one part at a time.
- Multi-Cavity: Higher upfront cost. We have to machine the cavity multiple times. However, this drastically reduces the unit price because we produce 2, 4, or 8 patterns in a single injection cycle.
Material Selection Impact: Why Steel Costs More Than Aluminum
Aluminum vs steel tooling is often where we can save costs for low-to-medium volume projects.
- Aluminum (7075/T6): It is softer and cuts much faster than steel. This reduces machining time and tool wear, lowering the mold cost. It is excellent for rapid development and production runs up to 50,000 shots.
- Steel (P20/H13): Hardened steel is difficult to machine and requires EDM (Electrical Discharge Machining) for fine details. It costs more but is virtually indestructible in an investment mould environment.
Unlike the high-pressure industrial die casting process where heavy-duty steel molds are mandatory to withstand immense force, investment casting involves low-pressure wax injection. This gives us the flexibility to use aluminum tooling to keep your initial costs down without sacrificing accuracy.
Investment Mould vs. Die Casting Mold
When clients ask about the difference between an investment mould and a die casting mold, I always start with the injection medium. In die casting, we force molten metal into a steel cavity under extreme pressure. In the lost wax casting process, we are only injecting wax. This fundamental difference dictates everything from tooling cost estimation to the die life cycle.
Comparing Injection Pressures and Tooling Wear
Die casting molds take a beating. They face high-velocity molten metal and thermal shock, requiring hardened tool steel to survive. Conversely, a wax injection die operates at low temperatures and low pressures. Since wax is non-abrasive, the wear and tear on the cavity is minimal. This allows us to use aluminum for the mold base, which is faster to machine and easier to handle.
Lifespan Analysis and Setup Costs
Because the operating environment is so gentle, investment moulds often outlast die casting tools. It is not uncommon for an aluminum wax die to produce over 100,000 patterns without significant degradation.
For initial setup, investment tooling is the clear winner. You aren’t paying for massive blocks of H13 steel or the complex cooling channels required for die casting. If you are looking to produce parts in A356 aluminum or 6061, investment casting offers a lower barrier to entry, especially for low-to-medium volume runs where the amortization of a expensive die cast mold just doesn’t make sense.
Key Differences at a Glance:
- Pressure: Die casting uses high pressure (locking force); Investment casting uses low pressure (wax injection).
- Material: Die cast molds require hardened steel; Investment molds often use aluminum.
- Wear: Die cast molds suffer thermal fatigue; Investment molds experience minimal wear.
- Cost: Investment tooling is typically 30-50% cheaper than die casting tooling.
Maintenance and Storage for Longevity
Protecting your investment mould isn’t just about careful handling during production; it requires rigorous maintenance protocols to extend the die life cycle. Since the wax injection die is the foundation of the entire lost wax casting process, neglecting it immediately leads to dimensional inaccuracies and surface defects in your final cast parts.
Cleaning Protocols for Wax Residue
Wax buildup is the primary enemy of precision in this industry. After a production run, we never use abrasive tools like steel wool or wire brushes, as these can scratch the highly polished cavity surfaces and ruin the finish.
- Solvent Cleaning: Use specialized mold cleaners that dissolve wax residue without attacking the metal surface.
- Soft Tools: Only use copper, brass, or plastic scrapers to remove stubborn wax from the parting lines.
- Air Blasting: Clear out vents and ejector pin holes with compressed air to prevent clogging that could affect the sacrificial wax pattern.
Preventing Oxidation in Steel Molds
While the aluminum vs steel tooling debate often focuses on cycle speed, maintenance requirements differ significantly. Aluminum naturally forms a protective oxide layer, but steel requires active protection. Even high-quality alloy steel materials used in production tooling can rust if exposed to humidity without barriers.
- Moisture Removal: Ensure the mold is completely dry and free of water condensation from cooling lines before storage.
- Protective Coating: Apply a heavy-duty rust inhibitor or mold shield spray immediately after cleaning to seal the surface.
- Lubrication: Grease the leader pins, bushings, and slides to prevent seizing during the next setup.
Best Practices for Long-Term Storage
How you store the tooling determines its readiness for the next order. We always store molds in a “closed” position under low pressure. This prevents airborne dust and debris from settling on the critical cavity surfaces and protects the parting line from accidental impact damage. Store the tooling in a climate-controlled environment to minimize thermal expansion and contraction cycles that could loosen components over time.
FAQ: Common Questions About Investment Moulds
When we talk to clients about setting up a production line, the same questions regarding the wax injection die and tooling longevity tend to come up. Here are the straight answers to the most frequent inquiries we get about the tooling process.
How long does an aluminum investment mold last?
This is where investment casting tooling shines compared to other methods. Because we are injecting non-abrasive wax rather than molten metal into the die, wear and tear is minimal.
- Aluminum Tooling: For most projects, a high-grade aluminum mold (like T6 or 7075) can easily last for 50,000 to 100,000 shots.
- Steel Tooling: If you opt for steel, the die life cycle is effectively permanent for most volume requirements, easily exceeding 500,000 cycles.
Since the pressure and temperature are low, thermal fatigue isn’t really an issue. Unless you are damaging it through mishandling, an aluminum mold is a durable, cost-effective asset.
Can we modify an existing mold for design changes?
Yes, but there are limitations. We use CNC machined molds to cut the cavity, so removing metal from the mold (which adds material to your final part) is straightforward. This is often called being “metal safe.”
However, if your design change requires adding metal back into the mold (to make a wall thinner or a hole smaller), it gets complicated. We have to weld and re-machine, or use inserts. It is always cheaper and faster to get the design right before cutting the tool, but minor adjustments are usually manageable.
What is the typical lead time for manufacturing a wax injection die?
Speed is a major advantage here. Since we don’t need to harden steel for weeks like in high-pressure die casting, we can move fast.
- Simple Geometry: 2–3 weeks.
- Complex/Multi-Cavity: 4–5 weeks.
If you need rapid tooling solutions, we can sometimes cut simple aluminum tools in under two weeks. Our goal is to get the investment mold ready for sampling as quickly as possible so we can move to the casting phase.
Do I own the tooling after production?
Absolutely. In the US market and globally, the standard practice is that once you pay the Non-Recurring Engineering (NRE) or tooling fees, the mold belongs to you. We act as the custodians of your property. We store, clean, and maintain the tooling between production runs to ensure it is ready for the next order, but the asset remains 100% yours.